
Yucateca Sopa de Lima (Lime Soup) (recipe adapted from the Hacienda Teya version)
First, a little background on Yucatecan food.
Yucatecan cuisine, derived from traditionally Mayan fare, differs somewhat from what most people consider to be Mexican food. While some of the ingredients are common to other parts of Mexico, Yucatan cooking makes heavy use of turkey, venison, sour oranges (used in many dishes), and a predominance of frijoles negro, (black beans) refried or whole, pickled onions, annatto spice and the slightly toxic and utterly unique epazote leaves.
Corn, corn tortillas, hot chillies (incendiary habanero and the milder Jalapeno and other peppers), coriander (leaves and seeds), tomatoes, avocado are used as they are elsewhere in Mexico. Chicken, Beef, pork, capers, olives, rice, black pepper, plantains and vinegar are perhaps post-Columbian colonial imports.
Signature Yucatecan dishes include:
Panuchos: a tostada made with corn tortillas stuffed with refried black beans topped with shredded white meat chicken or turkey that has been marinated in annatto spiced sour orange juice. Other toppings include sliced avocado, sour-orange pickled onions, tomatoes, and jalapeno peppers.
Salbutes: a tostada made with shredded chicken or turkey, lettuce, pickled onions, tomatoes, avocado and jalapeno pepper slices.
Papadzules: Rolled corn tortillas with eggs and covered in pumpkin and tomato sauces. Oddly enough considering the rather common ingredients, somewhat of an acquired taste.
Cochinita Pibil: A marinated (in sour-orange and annatto) pork dish that is cooked in banana leaves, most authentically in a pit.
Poc Chuc: Pork marinated in sour-orange juice and garlic and grilled over charcoal. Typically served with tomato and white onion salsa, roasted onion and fresh salsa.
Pavo en Relleno Negro: Turkey in black bean stuffing and sauce. A rather complex list of ingredients go into this dish including "black condiment", epazote, tomatoes, white onions. The stuffing includes pork, beef, onion, sweet green peppers, hard boiled eggs, black condiment and epazote leaves.
And . . .
Soupa de Lima ("Lime Soup"): can be prepared in the following manner:
(serves 8 and can be used as a light meal).
Ingredients:
- 1 pound shredded turkey or chicken breast (sometimes more, sometimes less)
- 1 head of garlic
- Pinch of oregano
- 1 Sprig of fresh coriander
- 1 pound white onions
- 14 oz green sweet pepper
- 7 onces of tomatoes
- Oil (corn or canola if you are health-conscious)
- 6 fresh limes
- 2 quarts of chicken broth. (or water with a couple of bullion cubes)
- A cup of tortilla chips (not Fritos!). (note: the more authentic way is to take four corn tortillas, cut then into 1 inch strips and fry them in oil)
Preparation:
- Cook the chicken along with garlic, oregano, coriander and salt in two quarts of water. When the chicken is cooked, remove the chicken from the broth and shred it with a fork or your fingers (by pinching off pieces with your fingers).
- Strain broth and set aside.
- Chop onions, pepper and tomatoes and sauté in a small amount of oil over a low heat until the onions are translucent.
- Add all of the ingredients above, plus the juice of four limes (more or less to taste) to a pot and cook for 10 minutes.
Serve in soup bowls over a sparse layer of tortilla chips and garnish the top of the soup with a couple of thin round slices of lime.
Feel free to experiment with ingredient proportions as in our experience, while the basic ingredients were similar in the several places we visited, proportions, savory-ness, relative abundance of broth vs. chicken varied quite a bit. If any of our vegetarian readers wishes to attempt a meatless version of this dish, we would be delighted to append it to this article!
Enjoy!
Cultural Notes: One unique dining experience in the Yucatan is to find restaurants or cantinas that offer botanas meals. Such establishments offer numerous free tapas-sized plates of many of the dishes mentioned here (and many more not mentioned) if you buy a beer, cocktail or some alcoholic beverage, however, one might even get by in some places with just an ice-tea or a soft drink. The amount of food served can be quite substantial, more than a meal.
Many Yucatecan eateries also offer live music ranging from Mariachi bands, pop bands to exquisitely beautiful romantic serenades that feature great vocal harmonies and outstanding guitar work. The capital city of the Yucatan, Merida closes down between 11am to 4pm, just about the only places that remain open are tourist shops, museums, restaurants and cafes. As the midday sun can be quite oppressive, it is perhaps entirely wise to do as the locals do, take a nap or enjoy a long relaxed lunch.
Presently, the US dollar is so weak that eating in restaurants can quite often be more expensive that a similar type meal in the U.S. Exceptions are botanas eateries, cocina ecomonica or the stalls that sell salbutes, panuchos and poc chuc or pulled-pork sandwiches (tortas) in the large outdoor and indoor markets. There can easily be a 10 to 1 price difference between food served in more mainstream restaurants and essentially the same (and in our experience sometimes better tasting) food found in the more humble and atmospheric market stalls.
- Details
- Hits: 4255
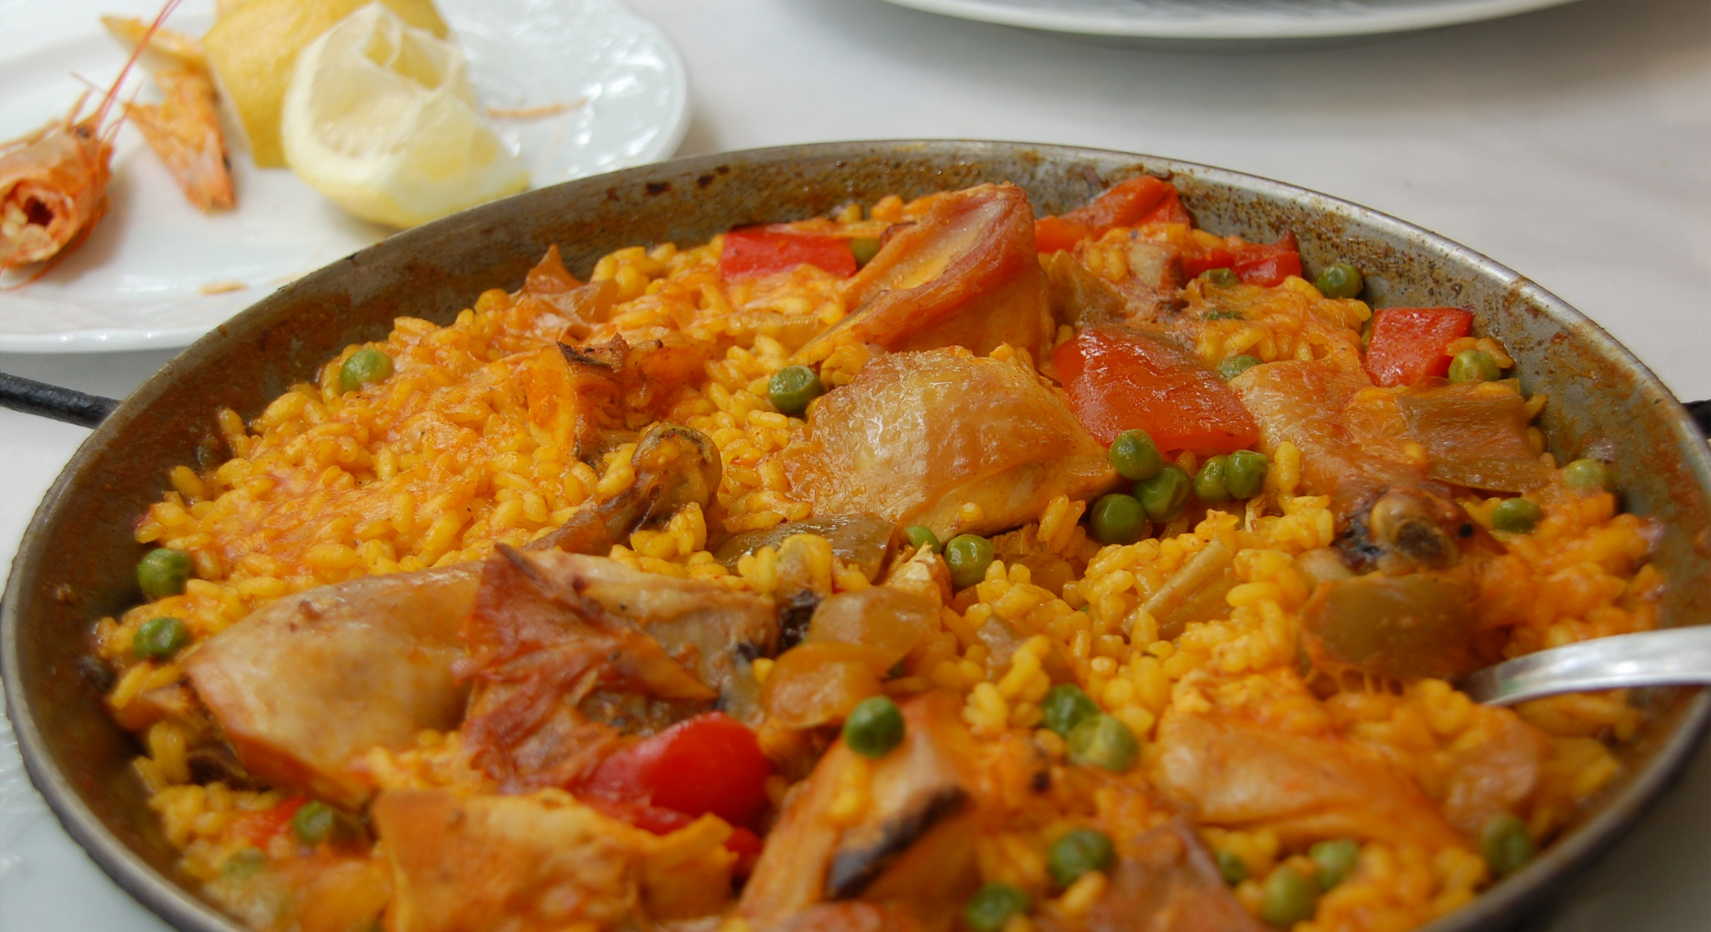
Paella is a Spanish rice dish that contains a mixture of ingredients which depending on the recipe might contain meat, seafood and vegetables. The most important ingredient in paella (other the rice and olive oil) is saffron, the world's most expensive spice which is also used in Middle-eastern and Indian cooking. Paella is traditionally cooked in a wide flat-bottomed steel pan over an open flame. A wood fire is most authentic, but a wide propane burner works well too.
Paella is thought to have originated in Albufera region in Valencia Spain and may date back to Moorish times. Unlike the paella found in most restaurants around the world, paella from Valencia typically does not include seafood. Below are two recipes, one a traditional Valencian version and the other is a more widely known seafood version. Paella is very adaptable and many different sorts of meats, seafood and vegetables can be used, one can even make completely vegetarian paella. Be creative! It is a dish that if favored for spring or summer picnics in Spain. Enjoy!
Ingredients:
- 3 leveled cups bomba or calasparra rice (short to medium-grain white rice)
- 6 cups chicken stock
- 3/4 cup olive oil (Spanish is best)
- 1 pound chicken - cut into small pieces
- 1 pound rabbit - cut into small pieces (or double chicken)
- 1 cup diced tomato
- 3/4 pound green flat beans - stem ends cut off, and cut into 1.5 inch pieces
- 1/2 pound shelled tavella beans - shelled.
- 1/2 pound garrofó beans - similar to flat whitebutter beans
- ½ teaspoon saffron
- 1 teaspoon sweet paprika
- Salt
Preparation:
- Heat the olive oil in a paella pan and brown the chicken and rabbit pieces until they become golden.
- Add the green beans, the garrofó and the tavella beans, and stir all ingredients. Sofry or caramelize-fry for 5 minutes.
- Add the grated tomato and cook at least 5 minutes.
- Add the bomba rice and stir briefly. Distribute the rice uniformly over the paella pan bottom. At this point the fire should be at its strongest or the heat source high.
- Immediately add the sweet paprika and the saffron. Add the boiling chicken broth and salt to taste. From now on, you shouldn't stir the paella any more. Cook for 16-18 minutes.
- Remove pan from heat, let it rest 5 minutes and then enjoy!

Seafood Paella
Ingredients:
- ¾ cup olive oil
- 6 cups chicken broth
- 1 cup dry white wine
- 3 cups bomba or calasparra rice
- 1.5 lbs skinless, boneless chicken breasts, cut into cubes
- 2 chorizo sausages, cooked and cut into chunks
- 10 mussels (scrubbed)
- 10 clams (scrubbed)
- ½ lb squid rings
- 1 lb uncooked medium large shrimp in their shells
- ½ lb frozen peas
- 1 large onion chopped
- 2 teaspoons minced garlic
- 1 cup medium diced tomatoes
- 2 red bell peppers, seeded and cut into thin strips
- 1 teaspoon paprika
- 2 bay leaves
- 1/2 teaspoon dried rosemary
- 1/2 teaspoon dried thyme
- 1/4 teaspoon ground cumin
- 1/2 teaspoon crushed saffron threads
- 1 tablespoon capers
- Salt and pepper to taste
- Lemon wedges and parsley, to garnish
Preparation:
- In a small saucepan, bring the broth to a boil and stir in the saffron. Reduce the heat to low and simmer for one minute.
- In the paella pan add olive oil and lightly brown chicken and chorizo pieces.
- Add onion, garlic and bell pepper and cook until just softened, about 3 minutes.
- Add tomatoes and spices.
- Stir in the rice, add the wine and the simmering broth.
- Bring to a boil
- Scatter the chorizo, shrimp, clams, mussels and squid on the rice, cover and cook until the rice is tender and the seafood is cooked through, 15 to 20 minutes.
- Add peas and capers during the last 5 minutes of cooking.
- Discard any shellfish that does not open.
- Remove the paella from the heat and let rest for 5 minutes.
- Garnish with the lemon wedges and parsley.
- Details
- Hits: 4378

Jamaican "Jerk" is a style of barbecue cooking that employs a dry rub of spices. The two most important spices are allspice and hot "Scotch Bonnet" chilies. One can substitute the more readily available Habanero pepper. WARNING! Scotch Bonnet and Habenero peppers are extremely hot, you are highly advised to use rubber gloves when you are handling them and whatever you do, don't rub your eyes after touching these peppers. or you will be an extremely unhappy person! To put this warning in perspective, these chillies are 10 to 40 times hotter than jalapenos. The recipe below calls for ground allspice, (otherwise known as Jamaican Pimento) which is readily available in grocery stores, but the most authentic method is to burn allspice wood over the cooking coals. Jerk rub is traditionally used with pork and goat although it can be used with chicken, fish, beef or even tofu. You can find jarred ready-made jerk spices, but that's cheating! (particularly since making your own is rather easy and straightforward). Ah sey one! (Jamaican slang for cool and great!)
Marinade Ingredients:
- 3 scallions, chopped
- 4 large garlic cloves, chopped
- 1 small onion, chopped
- 4 to 5 fresh Scotch bonnet or habanero chilie, stemmed and seeded
- 1/4 cup fresh lime juice
- 2 tablespoons soy sauce
- 3 tablespoons olive oil
- 1 1/2 tablespoons salt
- 1 tablespoon packed brown sugar
- 1 tablespoon fresh thyme leaves
- 2 teaspoons ground allspice
- 2 teaspoons black pepper
- 3/4 teaspoon freshly grated nutmeg
- 1/2 teaspoon cinnamon
Ingredients (Chicken):
- 4 chicken breast halves with skin and bones (3 lb), halved crosswise
- 2 1/2 to 3 pounds of chicken thighs and drumsticks
Preparation:
- Make marinade by blending all marinade ingredients in a blender until smooth.
- Marinate and grill chicken by dividing chicken pieces and marinade between 2 sealable plastic bags. Seal bags, pressing out excess air, then turn bags over several times to distribute marinade.
- Put bags of chicken in a shallow pan and marinate, chilled, turning once or twice. Let chicken stand at room temperature 1 hour before cooking.
Using a Charcoal Grill:
- Open vents on bottom of grill and on lid. Light a large chimney of charcoal briquettes (about 100) and pour them evenly over 1 side of bottom rack (you will have a double or triple layer of charcoal).
- When charcoal turns grayish white and you can hold your hand 5 inches above rack for 3 to 4 seconds, sear chicken in batches on lightly oiled rack over coals until well browned on all sides, about 3 minutes per batch.
- Move chicken as seared to side of grill with no coals underneath, then cook, covered with lid, until cooked through, 25 to 30 minutes more.
Using a Gas Grill:
- Preheat burners on high, then adjust heat to moderate.
- Cook chicken until well browned on all sides, 15 to 20 minutes.
- Adjust heat to low and cook chicken, covered with lid, until cooked through, about 25 minutes more.
- Details
- Hits: 4251

"Shish" (or sis) simply refers to any grilled meat. Kabob (kebap) is a skewer. Shish Kabab is not only popular in Turkey but it is also extremely popular throughout Europe, particularly in Germany and the UK where Kabobs are a readily available "fast-food." Variations of "kabobs" can be found throughout the Middle-East, Europe and South Asia. In Turkey, traditionally lamb has been the meat of choice for kabobs but nowadays chicken, beef and fish have become very popular. Due to the large number of Muslims in Turkey, pork is not used. Shish kebabs are typically made of both meat and vegetables. Perhaps the most favored vegetable is eggplant, but onions, tomatoes and bell peppers. Actually a wide variety of vegetables are suitable for grilling, including tomatoes, zucchini and even marinaded artichoke hearts. If tomatoes are used, it is best to use 1 1/2 - 2 inch tomatoes as cherry tomatoes will cook much faster than the other vegetables and meet. Unless you enjoy rather crunchy bell peppers, it is a good idea to parboil the cut up pieces for 2 minutes before skewering them (after they have cooled a bit). If you use bamboo skewers, be sure to soak them in water 30 minutes before using them otherwise they will burn and even catch fire! Actually I my experience metal skewers are preferable as they usually have flattened points that generally prevent vegetables like zucchinis and mushrooms from splitting when you skewer them. Bamboo skewers are perhaps more appropriate for Asian treats like Japanese yaki-tori or Indonesian, Malaysian and Thai sate.
Ingredients:
- 2 pounds of Lamb, Beef, Chicken or Firm Fish
- 1 lb of each vegetable (more or less according to your desires).
Preparation:
- Cut the meat into bite-sized pieces and then marinade it for 4-24 hours (the longer the better) in your refrigerator.
Marinade Ingredients:
Please note that this is a rather "all-purpose" marinade with somewhat authentic ingredients. There are an enormous number of possible variations, additions and subtractions. As the old Cole Porter song says EXPERIMENT! You can even buy pre-marinaded meats which make everything easier and quicker! Google "Shish Kebab Marinade" if you want to try what others have tried.
- 1 medium red onion, finely chopped (1/2 cup)
- 1/2 cup finely chopped fresh flat-leaf parsley
- 1 medium tomato, diced finely (3/4 cup)
- 1 teaspoon dried oregano
- 1/4 teaspoon thyme
- 1/4 tablespoon pepper
- 1/2 cup olive oil
- 3/4 teaspoon salt
Preparation:
- Before cooking, brush your charcoal or gas grill with a light coating of oil to prevent sticking.
- Cut vegetables into large bite sized pieces.
- Skewer the marinaded meat and vegetables in any order you desire, but it helps to figure out a pattern (zucchini, meat, tomato, mushroom, meat, eggplant, bell pepper, meat etc.)
- Barbecue over a medium level heat until the meat is lightly browned on all sides.
*If you wish to brush marinade on during cooking, make sure that you cook your skewered meat and vegetables for an extra two minutes on each side after the last brush of marinade.
Serve with Basmati rice, Lavash or Pita Bread. A mint/yogurt dressing is also a nice addition.
- Details
- Hits: 3996
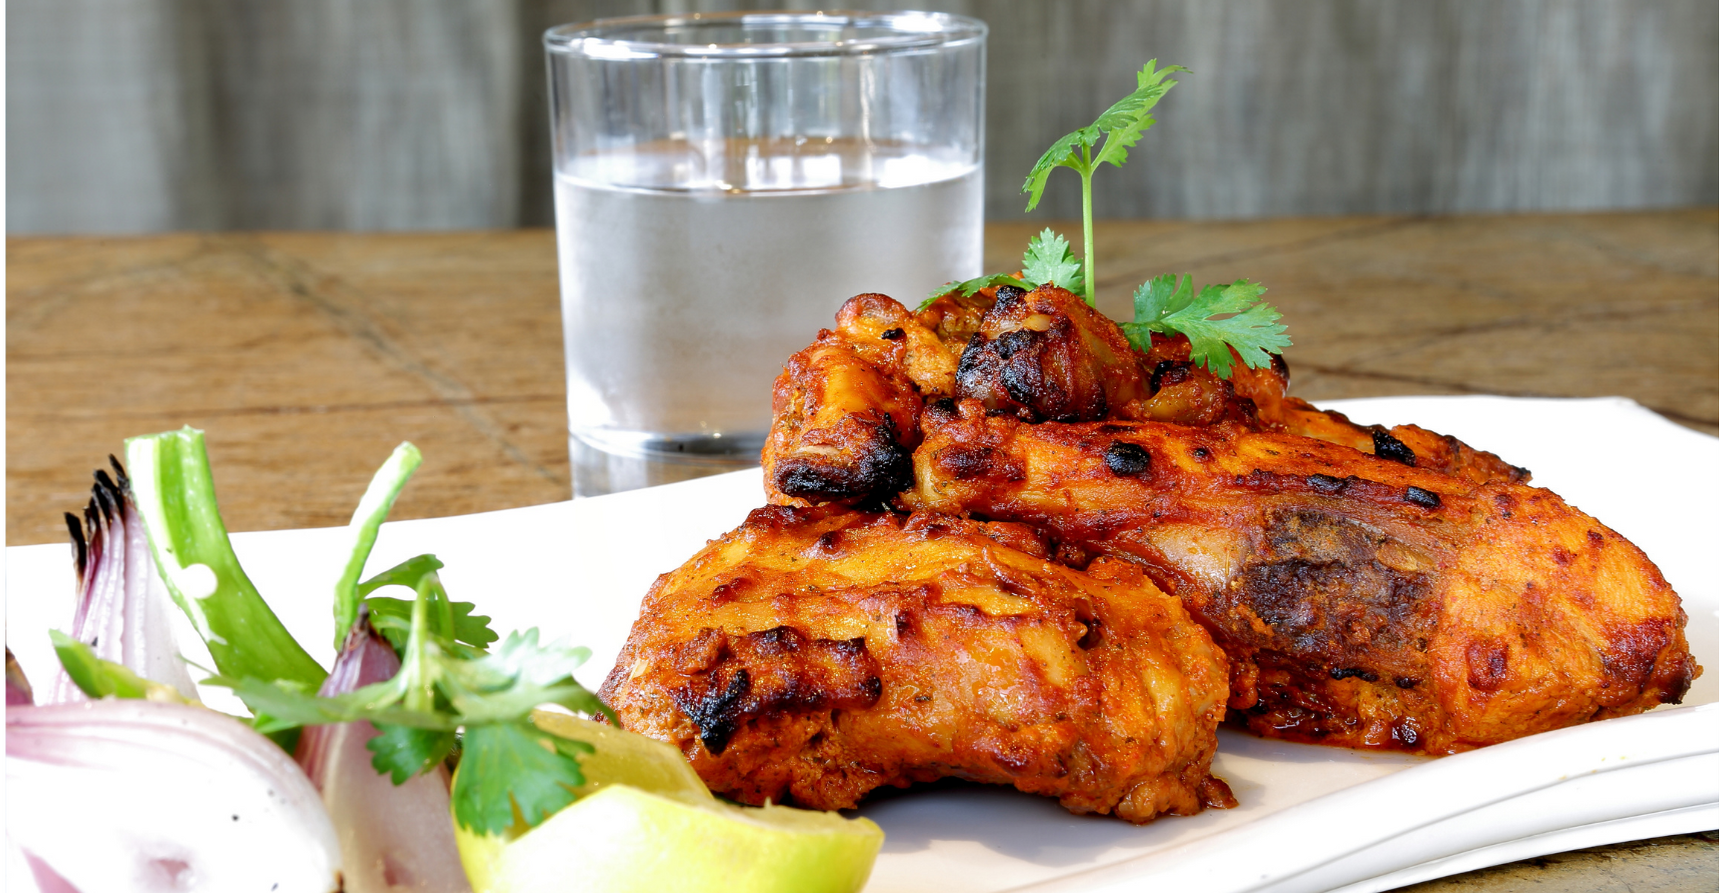
Ingredients:
- 1 (4 to 4 ½ pound) chicken, cut into 8 pieces, skin removed
- 2 tablespoons vegetable oil
- ½ cup chopped white onion
- 2 tablespoons chopped garlic
- 2 tablespoons chopped ginger
- 1 teaspoon finely chopped Serrano or Jalapeno pepper, stem and seeds removed
- 1 tablespoon paprika
- 1 ½ teaspoons salt
- 1 teaspoon cumin
- 1 teaspoon turmeric
- 1 teaspoon coriander
- 1 teaspoon garam masala
- ½ teaspoon cayenne
- ½ cup yogurt
- 1 tablespoon fresh lemon juice
Note: This recipe requires that the chicken be marinated for 4 or more hours.
Preparation:
- Cut diagonal slices 1-inch apart, and 1/2-inch deep into the larger chicken pieces. Poke holes in smaller pieces with a fork.
- Place the chicken in a baking dish.
- In a blender, combine the oil, onion, garlic, ginger, pepper and process on high speed until mixture becomes a paste.
- Add paprika, salt, cumin, turmeric, coriander, garam masala, and cayenne to blender and process until well mixed.
- Add the yogurt and lemon juice to blender and mix thoroughly.
- Pour the marinade over the chicken pieces. Turn to coat evenly, rubbing the marinade into the holes and slits.
- Cover tightly with plastic wrap, refrigerate for at least 4 to 24 hours.
- Preheat a grill. (even cooking in oven, set note below)
- Grill chicken for 10 minutes and then turn chicken over and grill for an additional 10 minutes.
- Turn and continue cooking as until the chicken is fully cooked.
Note: You can also bake or broil the chicken in an oven. To bake, preheat oven to 425 degrees F and cook chicken pieces on a baking sheet for 35 minutes, turning once.
- Details
- Hits: 4263
Joomla!
Extensions
The Joomla! content management system lets you create webpages of various types using extensions. There are 5 basic types of extensions: components, modules, templates, languages, and plugins. Your website includes the extensions you need to create a basic website in English, but thousands of additional extensions of all types are available. The Joomla! Extensions Directory is the largest directory of Joomla extensions.
Components
Components are larger extensions that produce the major content for your site. Each component has one or more "views" that control how content is displayed. In the Joomla administrator there are additional extensions such as Menus, Redirection, and the extension managers.
Modules
Modules are small blocks of content that can be displayed in positions on a web page. The menus on this site are displayed in modules. The core of Joomla! includes 24 separate modules ranging from login to search to random images. Each module has a name that starts mod_ but when it displays it has a title. In the descriptions in this section, the titles are the same as the names.
Content Modules
Content modules display article and other information from the content component.
User Modules
User modules interact with the user system, allowing users to login, show who is logged-in, and showing the most recently registered users.
Display Modules
These modules display information from components other than content and user. These include weblinks, news feeds and the media manager.
Utility Modules
Utility modules provide useful functionality such as search, syndication and statistics.
Navigation Modules
Navigation modules help your visitors move through your site and find what they need.
Menus provide your site with structure and help your visitors navigate your site. Although they are all based on the same menu module, the variety of ways menus are used in the sample data show how flexible this module is.
A menu can range from extremely simple (for example the top menu or the menu for the Australian Parks sample site) to extremely complex (for example the About Joomla! menu with its many levels). They can also be used for other types of presentation such as the site map linked from the "This Site" menu.
Breadcrumbs provide users with information about where they are in a site.
Page 17 of 29