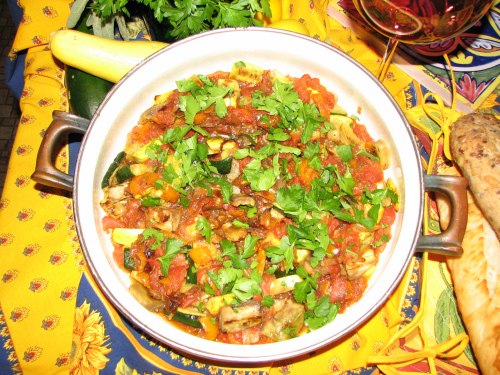
Ratatouille is signature dish of the the Provence region of southeastern France. The word ratatouille is derived from the verb touiller which means "to stir up." The dish is tremendously popular throughout France because it is easy to prepare, uses abundantly available ingredients, and can be served cold or warm.
The Provence region lies along the Mediterranean Sea just west of Italy. Provence's diverse topography is characterized by mountains, valleys, and beautiful beaches. (Sound familiar, San Diegans?) Originally a Greek colony, Provence was once a part of the Roman Empire and was eventually incorporated into France in the 15th century.<
The region's warm weather, coastal location, and the impact of other Mediterranean culinary influences has produced a cuisine at odds with stereotypical notions of French food. The Provencal cooking is more akin to neighboring Italy than to the rest of France.
It is said that there are three foundations to Provence cuisine: olive oil, garlic, and aromatic herbs (such as herbs de Provence). This makes ratatouille a quintessential Provencal dish
Our recipe and preparation follow the notion that in order to “do ratatouille right,” the component flavors should not be mixed and muddled. The vegetables should be cooked separately and then arranged in layers so that each will retain their distinct flavors.<
The following recipe is was adapted from "Mastering the Art of French Cooking" by Simone Beck, Louisette Bertholle, and Julia Child.
Ingredients
- ½ pound eggplant
- ½ pound zucchini
- 1 tsp. salt
- 4 tablespoon olive oil, more if needed
- ½ pound (about 1 ½ cups) thinly sliced yellow onions
- 2 (about 1 cup) sliced green bell peppers (orange peppers were used in this preparation.)
- 2-3 tablespoons olive oil, if necessary
- 2 cloves mashed garlic
- 1 pound firm, ripe, red tomatoes, peeled, seeded and juiced to make 1 ½ cups pulp
- 3 tablespoons minced parsley (Italian parsley used here.)
- Salt and pepper to taste
Preparation:
- Peel the eggplant and cut into slices 3/8 inch thick, about 3 inches long, and 1 inch wide.
- Place in a bowl and toss with salt. Let stand for 30 minutes. Salting and rinsing—"known as "degorging"—will soften and remove much of the eggplant's bitterness. Eggplant is capable of absorbing large amounts of cooking fats and sauces, allowing for very rich dishes, salting process will reduce the absorbtion of oil absorbed.
- Scrub the zucchini, slice off the two ends, and cut up like the eggplant.
- Place in a bowl and toss with salt. Let stand for 30 minutes.
- Drain the eggplant and zucchini slices and dry them on a towel.
- One layer at a time, sauté (for about one minute) the eggplant in hot olive oil. When lightly browned on each side, remove from pan and set aside. Sauté the zucchini in a similar fashion.
- In the same skillet, cook the onions and the peppers slowly in olive oil for about 10 minutes, or until tender but now browned. Stir in the garlic and season to taste.
- Boil a small pot of water and immerse the tomatoes for about 10 seconds. Remove, cool, and peel off the skins.
- Slice the peeled tomatoes through the center, and gently squeeze them over a bowl to extract the juices and seeds. Slice the juiced and seeded tomatoes into 3/8 inch strips. Lay the sliced tomato pulp over the onions and peppers. Season with salt and pepper. Cover the skillet and cook over low heat for 5 minutes, or until the tomatoes have begun to render their juice. Uncover, baste with the juices, raise heat and boil for several minutes, until juice has almost evaporated.
- Place a third of the tomato mixture in the bottom of a heavy casserole pot (the recipe calls for a 2 1/2 quart fireproof casserole about 2 1/2 inches deep) and sprinkle over it 1 Tb. of parsley.
- Arrange half of the eggplant and zucchini on top, then half the remaining tomatoes and parsley. Put in the rest of the eggplant and zucchini, and finish with the remaining tomatoes and parsley.
- Cover the casserole and simmer over low heat for 10 minutes. Uncover, tip casserole and baste with the rendered juices Correct seasoning, if necessary. Raise heat slightly and cook uncovered for about 15 minutes more, basting several times, until juices have evaporated leaving a spoonful or two of flavored olive oil. Be careful of your heat; do not let the vegetables scorch in the bottom of the casserole.
- Set aside, uncovered, and reheat slowly at serving time, or serve cold.
Bon Appétit
Text by David Craven
Photos and dish preparation by Pattie Anderson
- Details
- Hits: 3643
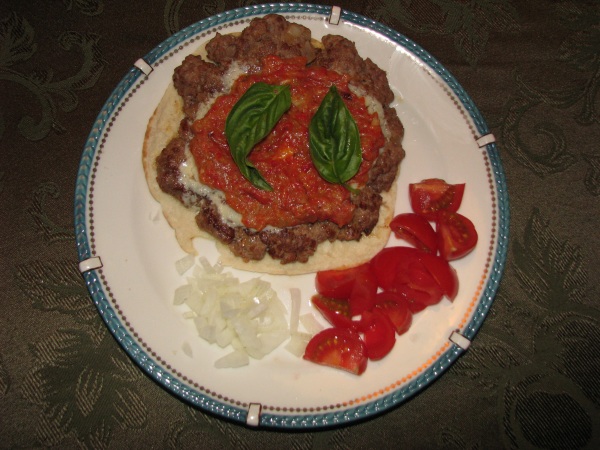
This month's recipe selection coincides with our book of the month, the Tiger's Wife, whose story is set in the Balkans.
America is considered the land of the burgers, but dining denizens of Serbia, Croatia, Slovenia, Herzegovina, Montenegro, Bosnia, Macedonia, and more recently Germany and Austria might take issue. Pljeskavica, being derived from the Serbian word for clapping hands, are meat patties with an attitude. Typically much larger than an American burger, Pljeskavica are a mixture of onions, paprika, garlic and one or more kinds of ground meat. Like hamburgers, the preferred method of cooking is grilling. Their distinctive taste is developed by mixing and then refrigerating the ingredients for several hours so that the flavors can meld. As the ingredients need to be refrigerated for several or more hours, a bit of time management and planning is requisite.
There are many regional variations in ingredients and Pljeskavica are served; all by themselves on a plate, in buns like their American cousins or between thick flat breads known as Lepinja (pitas are a handy substitute). Chopped tomatoes or onions can be served alongside (or as toppings). a popular side dish is Serbian Potato Salad which employs oil and vinegar rather than mayonnaise or sour cream.
Pljeskavica are also often served with Ajavar (aka Serbian Salsa) and/or Kajmak (a rich and creamy dairy topping). These condiments can also be served on the side or as toppings. Ajavar might be able to be found in specialty market, but freshly made from scratch is best if you want the full flavor. Ajvar can be eaten in a variety of ways, on toasted garlic bread, on salads or sandwiches, atop grilled fish, with pasta, with meats (particularly grilled meats and kabobs), and whatever else that might do with a exquisite blast of zesty flavor.
Pljeskavica Ingredients:
- 1 pound ground beef
- 1/2 pound ground pork
- 1/2 pound ground lamb
- 1/2 cup finely chopped onions
- 1 1/2 teaspoons salt
- 2 teaspoons sweet paprika
- 1 teaspoon black pepper
Preparation:
- Mix ingredients in a large bowl.
- Cover bowl and refrigerate for 3 hours or more (overnight is best).
- Form mixture into large round thin patties. (typically Pljeskavica are of a much greater diameter that American hamburgers. Rolling the ground meat into handful-sized balls and then flattening them between two pieces of waxed paper or plastic wrap (the paper works better), will allow you to achieve the proper size. Transfer the patty to the pan by flipping the bottom sheet of paper over into the pan. If you desire to eat the Pljeskavica between a split pita, cooked they should be the size of the pita.
- Refrigerate patties for another hour to firm them up.
- Grill (or fry) the Pljeskavica to your favored level of doneness.
Serve Pljeskavica burgers with Ajavar salsa, Kajmak (or creamy yogurt), a side of vinegar and oil based potato salad, french fries, tomatoes (chopped or wedges), chopped onion or whatever other condiment or side-dish that your taste buds desire! They can be eaten "hamburger style" but serving them between warmed split pita bread.
AJVAR
Ingredients:
- 6 red bell peppers
- 1 medium eggplant
- 6 unpeeled cloves of garlic
- 1/2 cup of olive oil
- 1 teaspoons of white vinegar or lemon juice
- Salt and pepper, to taste
- 1/4 teaspoon of red chili flakes
- a couple of basil leaves for garnish
Preparation:
- Place oven rack in the middle position and preheat oven to 475 degrees. Halve each pepper, discarding stems and seeds. Place peppers, cut side down, on a baking sheet.
- Cut eggplant in half lengthwise, score with a knife and coat with 1 tablespoon of olive oil, salt it lightly and place the two halves on the baking sheet. Place the 3 unpeeled garlic cloves on the side of the baking sheet that will be closest to the oven door.
- When oven reaches temperature, put the baking sheet in the oven the bake for 10 minutes and then remove the garlic cloves.
- Continue baking the red peppers and eggplant for another 20 minutes, until the skins have turned black. Please note that eggplant skins may blacken before the red peppers do. If this happens remove the eggplant first and continue baking the peppers.
- After you remove the garlic from the oven, let it cool to touch. Peel the skins off the cloves and chop the garlic finely.
- When the peppers are fully roasted, remove them from the oven and immediately place them in a bowl. Cover the bowl with a clean dishcloth or plastic wrap and let sit for 10 minutes. This will make the peppers easier to peel. When cool, peel the blackened skins off the peppers using a small knife.
- With a large spoon remove the pulp of the eggplant, discard the skins. Chop the eggplant pulp coarsely.
- Put the eggplant, peeled peppers, salt, pepper, vinegar, chopped garlic, chili flakes and the remaining olive oil in a food processor. Pulse the mixture until somewhat smooth but do not puree it, it should be a little bit lumpy.
- Pour mixture in to a serving bowl and garnish with fresh basil.
- Serve ajvar with toasted bread slices drizzled with olive oil.
Kajmak
Kajmak can be enjoyed as an appetizer or as a condiment. It is very commonly eaten with Pljeskavica and other grilled meats. in Turkey fresh Lepinja bread filled with Kajmak along with preserves or honey is a favored breakfast treat. Kajmak is definitely not for people who have to conscientiously watch their fat intake.
Ingredients:
- 1 quart of heavy cream
Preparation:
- Pour cream into a large saucepan
- Bring cream to a low simmer (just bubbling)
- Simmer for 1 hour
- Every few minutes, take a ladleful off the top of the simmering cream, hold the ladle very high above the pan and then poor its contents back into the sauce pan. Please note: BE CAREFUL when you do this, you don't want to burn yourself and you don't want to make a mess of your kitchen. It might take a wee bit of practice to get the right motion to do this well. All the recipes that I consulted include this step, but without explanation. It may have some beneficial effect with regard to thickening, but when I made the Kajmak I quickly discovered one good reason. Getting the simmering temperature just right is a bit of a challenge, you want the cream to just start bubbling. Regardless, due to some unknown (at least to me) inner workings of heat and cream, in a few minutes the cream will very rapidly decide to rise up and overflow the pot (putting new meaning into the adage "the cream always rises to the top"). the ladle trick seems to cool the mixture just enough to prevent this from happening. If you watch the pot early on you should be able to gauge the frequency you need to employ the ladling in order to prevent your stove from being anointed with boiling cream.
- After simmering for an hour, pour thickened cream into a bowl, cover and refrigerate over night.
- The following day the Kajmak will be fully congealed and ready for use. Similar to butter in consistency, it retains its creamy essence and tastes a good deal less oily than butter.
Уживајте!(Enjoy!)
Recipes by T. Johnston-O'Neill
Photos by Shari K. Johnston-O'Neill
- Details
- Hits: 4146
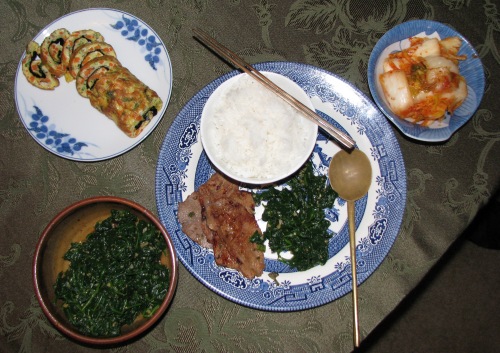
Traditional Korean meals consist of one or more main dishes and a 2 to as many as 20 side dishes known as banchan. The most well-known Korean side dish is kimchi. While spicy, pickled and fermented cabbage is the most popular form of kimchi, the Kimchi Field Museum in Seoul has documented 187 historic and current varieties of kimchi. Most kimchi uses some form of cabbage, radish or cucumber. Traditionally kimchi was fermented in large ceramic pots which were buried in the ground for moths. While it is possible to make your own kimchi, it is a long process (particularly if it fermented), so most folks just buy it at the store. From type to type and brand to brand there is a great deal of variation in the taste (and level of fermentation) of kimchi, if you try one that does not suit your taste buds, try another. Highly fermented kimchi might, for some, be an acquired taste but some Korean's eat it for nearly every meal.
The are a very large number of dishes that can be enjoyed as bachan (side dishes). We have listed two below, a Korean style omelet, and a spinach dish, but the pa jun we featured in a previous recipe of the month would be a suitable addition.
Bulgolgi
Bulgolgi, often referred to as "Korean BBQ", is spicy and sweet marinated meat that is grilled on a Korean-style grill. A smaller home version of a Korean grill can be purchased in either a Korean grocery (like Zion Market) store. It can be used on a gas stove or you can purchase an inexpensive butane burner (also widely available at Asian markets.) which makes the whole affair quite portable, perfect for a picnic! Given proper ventilation, you can set up the butane burner on your dining table, Bulgogi is delicious directly off the grill. Bulgogi is usually served with green leaf lettuce which is wrapped around the bulgolgi so that it can be eaten with the fingers. A typical condiment to spice the cooked meat is Korean red pepper paste (kochujang).
Gaeran Mari (Rolled Omelet)
Gaeran Mari is easy to make and looks fabulous on the table. In addition to being served as a side dish, it can also be eaten for breakfast, just like any other omelet. The toasted seaweed really sets gaeran mari apart from other omelets.
Ingredients:
- 3 eggs
- 1 scallion (green onion), finely sliced
- 1 small carrot, finely chopped
- 1 sheet Korean roasted seaweed (gim), Japanese nori works fine.
- salt and pepper to taste)
- olive oil for cooking
Preparation:
- Mix eggs with whisk or fork and add onions and carrots until well combined.
- In a lightly oiled sauté pan, pour egg mixture and heat slowly over low heat.
- Heat slowly for a few minutes until almost cooked through, then place seaweed sheet on top of omelette.
- Roll omelet into a tight roll by lifting side with spoon or baking spatula.
- Let omelet rest for a few minutes to cool.
- Slice into 1 inch pieces and serve on medium sized plate with cross-sections showing.
Sigumchi Namul (Seasoned Spinach)
Ingredients:
- 1 pound thoroughly washed spinach
- 3 tablespoons soy sauce
- 1 tablespoon sesame oil
- 1 tablespoon sesame seeds
- 2 cloves finely chopped garlic
- 1 teaspoon sugar
Preparation:
- Blanch the spinach in boiling water for 30 seconds.
- Remove spinach quickly and rinse in cold water.
- Gently squeeze the spinach to remove excess water.
- Mix soy sauce, sesame oil, seeds, garlic, and sugar together and then blend into the cooked spinach.
- Serve in a small side dish
Enjoy!
Recipes by T. Johnston-O'Neill
Photos: Shari Johnston-O'Neill
- Details
- Hits: 5030
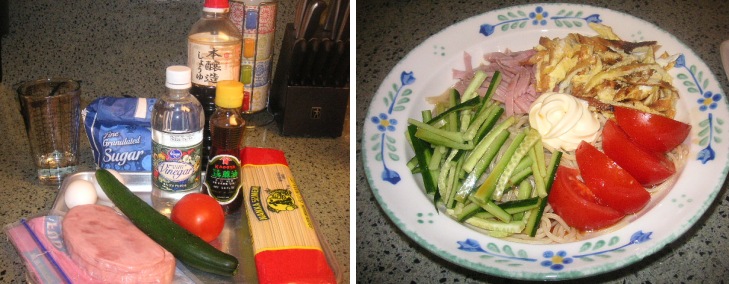
Hiyashi Chuka 冷やし中華 (Hiyashi=cold, Chuka=Chinese) can be enjoyed year-round but in Japan it is said that when restaurants start serving Hiyashi Chuka, summer has officially arrived. To fully appreciate Hiyashi Chuka in the hot summer months, the colder the ingredients the better. This noodle dish is refreshing, colorful and easy to make!
Ingredients:
Main:
- 8 ounces dry Chinese egg noodles (that look like spaghetti
- 2 eggs to make omelette
- 1 ripe tomato
- 1 Japanese cucumber
- 4 slices of ham
- Red ginger (beni shoga 紅しょうが) (optional)
- Plain or toasted sesame seeds (optional)
(Note: the sesame oil, rice vinegar, ginger and sesame seeds can be found in Japanese grocery stores
such as Mitsuwa or 99 Ranch Market)
Sauce (tare たれ):
- 1/4 cup white or rice vinegar
- 1/8 cup water
- 3 tablespoons low-sodium soy sauce
- 3 tablespoons sugar
- 1 teaspoon sesame oil
Preparation:
- Put all sauce ingredients in a microwavable bowl and heat for 30-45 seconds until sugar disolves. Mix well and refrigerate to chill
- Cook egg noodles until done and then strain in colander. Rinse cooked noodles in cold water until cool. Set aside.
- Beat eggs and make a thin omelette. Set aside to cool.
- Slice the tomato into small wedges
- Slice the cooled omelette and the ham in to thin strips
- Slice the cucumber, into thin strips.
- Serve the Hiyashi Chuka on plates or in shallow bowls. Cover the plate with noodles and then top tomato, cucumber, omelette and ham in an esthetically pleasing manner.
- Pour the sauce over the dish and sprinkle with sesame seeds. For a final touch, garnish sparingly with red ginger.
Recipe and photos: Asako Suzuki
- Details
- Hits: 3630
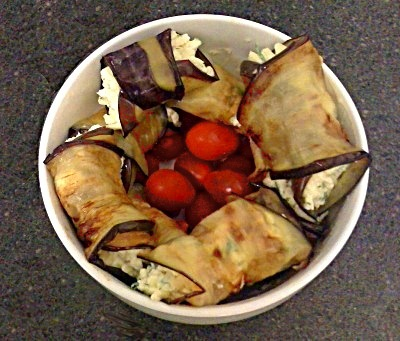
Eggplant rolls stuffed with cheese (Baklajan S Sirom) are a very popular appetizer in Russia and post-Soviet republics in Europe and Asia. Eggplant recipes come from South-Eastern Europe countries such as Ukraine, Moldavia, and those located in the Caucuses mountains. the essential ingredients for this dish are lightly salted soft or curd cheese mixed with herbs and flavorings like parsley and cilantro, garlic and shredded walnuts. in Bulgaria goat cheese is usually used as an ingredient for eggplant rolls. One exotic variation of this recipe comes from Georgia. There, it is very common to add bits of pomegranate and crashed nuts in the cheese paste. Sometimes paste is handmade in order to squeeze the juice from pomegranate bits and add exclusive taste to the dish. Eggplant rolls stuffed with cheese are a perfect appetizer for any occasion. This recipe calls for Edam cheese but you can also make it with Russian-style Tvorag cheese (directions below).
Ingredients:
- 1-2 American eggplants
- 1 pound of semi-soft cheese (like Edam)
- 5-6 cloves of garlic grated or finely chopped
- 3-4 sprigs of fresh parsley and dill(to add into the cheese paste)
- 3 tablespoons of mayonnaise
- 1 hard boiled egg chopped fine
- Salt and pepper
- Olive Oil for frying
Preparation:
- Wash eggplants and cut lengthwise into strips the length of the eggplant, 2 inches wide and 1/2 inch thick
- You need to disgorge the eggplant. Apply salt on each slice, put all slices on big wide plate, wrap with plastic or cover with another plate and chill in the refrigerator for 30 minutes.
- Shred the cheese with grater into a deep dish
- Peel and grate garlic
- Finely chop hard boiled egg
- Chop parsley and dill
- Mix all of the ingredients* above with mayonnaise, salt and pepper
- After the eggplant strips have chilled for 30 minutes, remove them from the refrigerator and pour off the accumulated liquid and rinse strips in cold water.
- Fry eggplant strips in the frying pan with a little bit of olive oil until lightly browned
- Let eggplant cool
- Place a dollop of cheese mixture at the end of a strip and roll it.
*You can also add crushed walnuts or almonds.
Tvorog (Russian Curd Cheese)
If you are interested in expanding your gastronomical tastes and up to try something new, you can make these rolls with a curd cheese based on Russian recipe that only has two ingredients, whole milk and yoghurt.
Ingredients:
- 1 quart of whole milk
- 6 ounces of Greek-style yoghurt
Preparation:
- Combine the milk with the yoghurt in a lidded container (a yoghurt maker is perfect)
- Stand in a very warm place until the mixture resembles yoghurt. the temperature and length of time to form the yoghurt stage will effect the taste. This part of the process (essentially you are making more yoghurt) will take several days. Tvorog should have a 'bite' to it, but if you keep it too long at this stage it can become bitter.
- Reserve around half a cup of the yoghurt mix and keep in the fridge to start your next batch of tvorog.
- Pour the remaining yoghurt into a saucepan and heat on low
- Allow the mix to come to a gentle bubble, do not stir.
- Keep heating the yoghurt until it separates into curds, resembling the texture of cottage cheese
- Line a colander with 3 layers of cheesecloth or muslin and place the colander into a larger bowl or in the sink.
- Pour the mixture into the colander and allow the watery whey to drain.
- When most of the liquid has drained out, draw the ends of the muslin together at the top and secure with a rubber band or knot to form a bag.
- Hang the muslin bag over a sink to drain thoroughly. the tvorog should be very dry - much drier than cottage cheese
- Remove the tvorog from the muslin and store in a container in the fridge.
Note: When using tvorog as a filling for the eggplant rolls, the flavor will be enhanced with the addition of a bit more salt.
Recipe by Olga Kolpakova. Tvorog recipe adapted from www.russianrecipes.co.nz
- Details
- Hits: 4315
Joomla!
Extensions
The Joomla! content management system lets you create webpages of various types using extensions. There are 5 basic types of extensions: components, modules, templates, languages, and plugins. Your website includes the extensions you need to create a basic website in English, but thousands of additional extensions of all types are available. The Joomla! Extensions Directory is the largest directory of Joomla extensions.
Components
Components are larger extensions that produce the major content for your site. Each component has one or more "views" that control how content is displayed. In the Joomla administrator there are additional extensions such as Menus, Redirection, and the extension managers.
Modules
Modules are small blocks of content that can be displayed in positions on a web page. The menus on this site are displayed in modules. The core of Joomla! includes 24 separate modules ranging from login to search to random images. Each module has a name that starts mod_ but when it displays it has a title. In the descriptions in this section, the titles are the same as the names.
Content Modules
Content modules display article and other information from the content component.
User Modules
User modules interact with the user system, allowing users to login, show who is logged-in, and showing the most recently registered users.
Display Modules
These modules display information from components other than content and user. These include weblinks, news feeds and the media manager.
Utility Modules
Utility modules provide useful functionality such as search, syndication and statistics.
Navigation Modules
Navigation modules help your visitors move through your site and find what they need.
Menus provide your site with structure and help your visitors navigate your site. Although they are all based on the same menu module, the variety of ways menus are used in the sample data show how flexible this module is.
A menu can range from extremely simple (for example the top menu or the menu for the Australian Parks sample site) to extremely complex (for example the About Joomla! menu with its many levels). They can also be used for other types of presentation such as the site map linked from the "This Site" menu.
Breadcrumbs provide users with information about where they are in a site.
Page 20 of 29


